| I will assume that you have gotten yourself a team by entering a valid team-name here, and that you are inside the game when reading this.
You are now the owner of a newly created team, probably in a low division where the opposition is moderate. (Hint: click on the images for full screenshots) Your first line-up 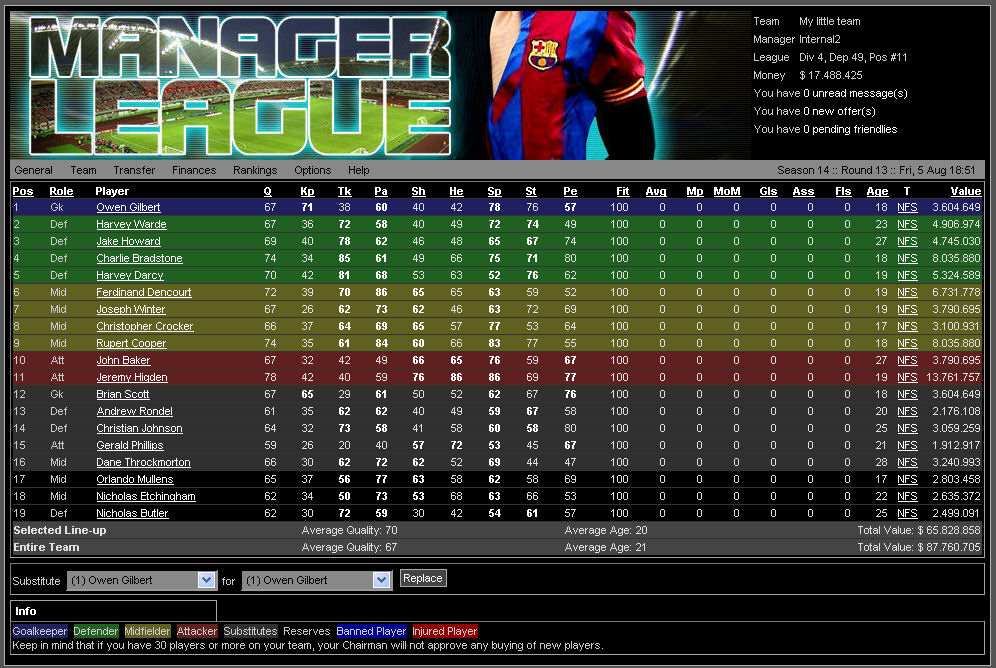
The first thing you should do is take a good look at your team, under Team / Team Selection. It is more than likely that not all of your best 11 players are set up on your default line-up, the top 11 positions. So we might as well start by moving in the players with a high Quality. With my team, that meant quite a lot of moving, 6 players in all. When that has been done, make sure you move some decent players into positions 12-16, as those are your substitutes. If a player is injured during a match, these players are the ones that can be substitued in. If you should ever happen to bring a BANNED player into a league-match or a playoff-match, he will be substituted with one of these before the match begins. A side-note on subs: If a player is injured during a match, the first sub with the same role as the injured player will be replacing him. Do you really need all those players? At this point, it is time to consider letting the worst players go. Sacking some players is good for the economy, as you get a little "payback" and save some salary-expenses for them. Personally, I sack the worst players over 20 years old, until I have 20 players left on the team. To sack a player, click on the players name, then click on "Sack <playername>" on the pop-up with the player-details. All them numbers! 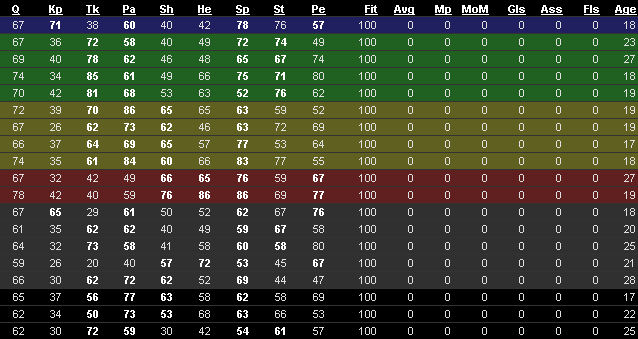
If you want to, it is now a good idea to spend a few minutes looking at you team a little more in-depth, not just the Quality. The players have 8 visible normal attributes, and they are Keeping, Tackling, Passing, Shooting, Heading, Speed, Stamina and Perception. In addition, Fitness is important, as it will quickly show if a player is tired, slightly injured etc. Quality is merely a quick-glance value, it is only based on the other stats. There are hidden attributes as well that affect your players but can not be seen. Flare and Temper are two such attributes. There are more! At this point, you might want to consider the selected formation. You can change it if you go to Team / Tactics in the menu. If you have a lot of good midfielders, the 3-5-2 can be a very offensive and good formation. If you only have 1 good attacker, and you do not wish to buy any new ones, 4-5-1 has been known to work too. Most player go with the 4-4-2 formation, but 4-3-3 is also widely used. Look at you team, see which fits your team better, and give it a try. Be warned though, playing with just 3 defenders usually requires 3 GOOD defenders, but feel free to try. Since we are on the tactics-screen, now it is time to spend some time going back and forth between Tactics and Team Selection to set up the Key Positions. First of all, you want a Captain who is not 17 years old. Having too many young players in your lineup, can be risky, but at least make sure you have a seasoned captain. For Freekicks on your own half, pick a player with a good passing-skill. When it comes to Freekicks taken on the opponents half, its a harder choice. Some of these freekicks will be direct, and so a good shooting-skill would be beneficial. But some will be normal layups, where a passing-skill is more important. So pick a player with the highest combination, or simply decide to go for one of them. A corner-taker should be a good passer. And a penalty-taker would ideally be a good shooter. (Allthough young players can be a bit unstable on this point). Keep in mind, even though you have specified freekick- and corner-takers, others will take them from time to time. Remember to hit the Update Key Positions and roles here, and we can move on to the Team Tactics. Team Tactics 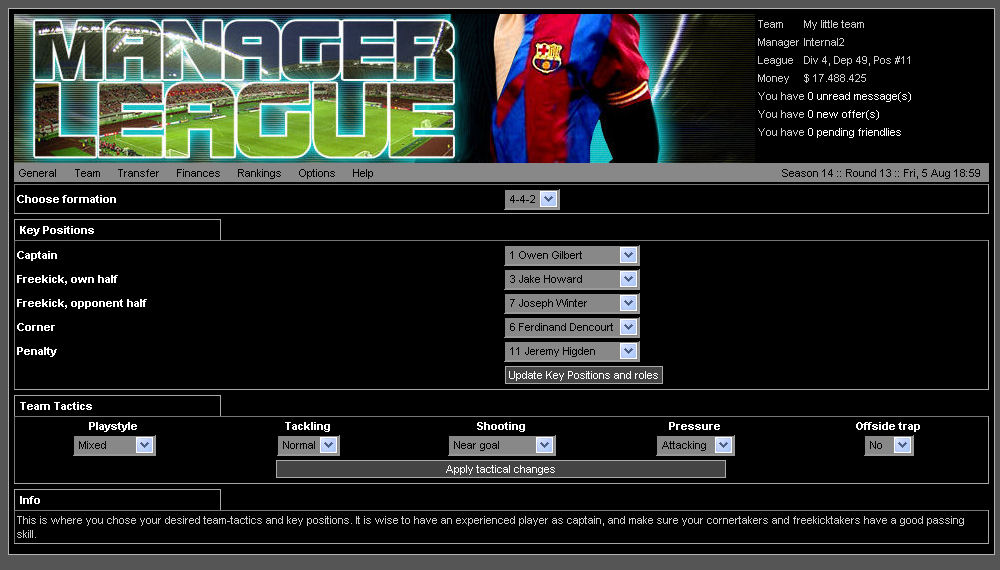
Here you must set 5 important settings that will affect your team a great deal duruing the matches. Playstyle: Continental, Longball or Mixed. This is a matter of taste of course, Longball means more longer passes, while continental means more short passes. Mixed is somewhere in between. Tackling: This will determine how eager your players will be do perform tackles, and how hard they will go in. The harder they tackle, the more your team will steal the ball and try to stop your opponents, but the more likely you are to get a yellow card, or worse (!). Your players have a hidden Temper-attribute that plays a vital role here as well, so keep an eye on squad-memebers who get a lot of cards. Also, when a player accumulates 3, 5 or 7 foul-points, he will be banned for 1 league-round. Shooting: This setting can be used to tell your players wether you wish them to shoot from 25 meters if they feel they get a chance, or wait until they are more certain to score. "Shoot at will" will therefore lead to more shots, while "Only when safe" will most likely mean fewer (but possibly better) chances. Pressure: This setting affects how "high" your team will put pressure on the opposing team. "Attacking" will mean your team will focus on attacks, leaving you more prone to counters, while "Defending" will do the opposite. If you meet a supposedly better team, "Defending" is often a wise choice. Offside-trap: This setting tells your defenders wether to actively use an offside-trap to lure attackers into offside positions. Normally a good idea, but if your defenders are not good enough, it is easy to make a mistake here. Also, the referees are not always perfect in determining who is off-side and who is not. Note: There is no such thing as THE BEST CHOICE in these settings. They are different, and affect different things, and some are better suited to some teams and against other teams, but none are BETTER. Make your desicions, then click "Apply tactical changes". Now we will enter the section that deals with collective training of the team, under Team / Team Training. Team Training 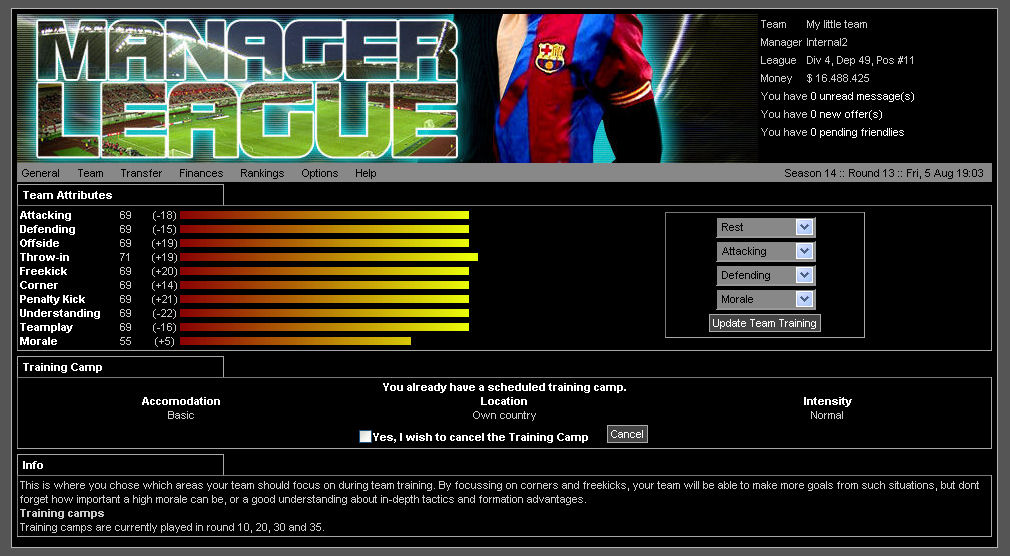
Before we look at the attributes and decide which to train, there are a few things you should know about training: - Training happens 2 times per weekday in ManagerLeague: At 09:00 and 21:00 (server-time) - There are special Training Camps 4 times per season you can attend as well, they take place in the league-rounds 10, 20, 30 and 35. Back to the Team Training page: Here you will see your team's Team-attributes, which should be fairly even to begin with. You have 4 slots, which means you can train 4 different things, or, as we recommend, leave 1 of them on Rest. Allocating one of these slots to Rest, will give your entire squad added fitness during training. Some allocate 2 slots even, specially late in the season. But, since you have a new team, we will go with 1 slot on Rest, 1 on Morale, and you can pick the last two for yourself. There is no harm in training the same item in several slots. During training, you may increase in the stats you are training here, and you may also decrease one of the items you are NOT training. The higher the better, of course, but also the harder to train. It is wise to change these now and then. Remember to click Update Team Training. If you feel like you can afford it, you may also order a Training Camp now. Accomodation: A better accomodation will provide more fitness during the camp. Location: Going abroad is popular with the aquad and can give a boost in morale Intensity: The harder they train, the more likely it is to benefit the team, but this also increases the risk of injuries while training. If you are new, try a training-camp with Basic Acoomodation, in your Own country, with Normal intensity for starters. Keep in mind, training camps cost 1 credit, not just the ingame money. If you do not know what credits are, no worries, they will be explained in Part II of this tutorial. Ok, that's enough collective training. Over to more individual stuff for each player: In the menu, go to Team / Individual Training. 
Here you see the listing of your entire squad, their attributes, an easy-to-use checkbox for when a player needs to Rest, a drop-down where you can decide each players training, and two strange numbers called "Diff" and "Total". "Diff" shows you how much the player has gained IN THE ATTRIBUTE HE IS CURRENTLY TRAINING, since the start of the season. "Total" tells you how many attribute-points he has increased in total since the start of the season, all attributes added up. So (+5) might mean he has increased 2 in passing and 3 in tacking. So what to train? All Roles have some attributes that are more important than others. Defenders shoot less than attackers, and goalkeepers tackle a lot less than a defender. Most roles use their passing-skills a bit, and speed is important to everyone. Stamina is quite important to everyoen but the goalkeeper too, to avoid getting too tired, and to avoid injuries / recover quickly from them. But each role has a primary attribute: Goalkeeper: Keeping Defender: Tackling Midfielder: Passing Attacker: Shooting Some like to train their primary skills until they are 75 or more before they begin to consider other attributes, while others prefer to train the lowest attribute among those most important to the player. As you can see, the most important stats for each role are listed bold both here and in the Team Selection listing, so whatever you train, it is usually one of these. One important thing to keep in mind: There are 2 types of "training" in ManagerLeague, one being the regular training all players do every round, and the other is "match-training". Match-training simply means that the players you use in a match, might improve their skills during the match. This will not consider what you have told them to train, but can be theoretically anything. The more a player uses the passing-attribute in a match, the more likely it is that that attribute can be trained. On rare occasions, you can even have a goalkeeper advancing in Shooting etc, it happens. Consider the following when deciding on what to train: - The higher the attribute, the harder it is to advance in it - The higher the "DIFF"-value, the harder it is to advance in it - The higher the age, the harder it is to advance, at least after 23 years Also note: - When we cross into a new season, all players will lose some attribute-points due to their vacation and the BBQ-season. Resting: When to rest? A player with fitness lower than 80 is rarely any good at all out on the field. Even 90 is a setback. We recommend setting players to rest once they go below 90 (or maybe just skip a match), and rest them until fully healed back at 100. Just click the checkbox for Resting the players you wish to rest, and they will regain fitness during the next training-session. The amount of fitness regained is based upon their Stamina, which is a good reason to make sure the players have a decent value there too. Ok, now we have set up the team, selected a set of tactics, set up training both collectively and individually and ordered a training camp. Now what? Get a sponsor! Anyone NOT getting a sponsor is missing a lot of potential income. Sponsors may come and go, and the offers you will get depend on both Divison, Position and a bit of random market-trends. What they offer is also different, some pay all the money upfront, some pay a portion each round, and some pay only bonuses for certain acchivements. The sponsor you select will stay with you for the current season, so make sure you pick one which suits your teams abilities and hopes. So see what is available, and choose one from Finances / Finances in the menu. And since we are talking about money..... Upgrade Your Stadium 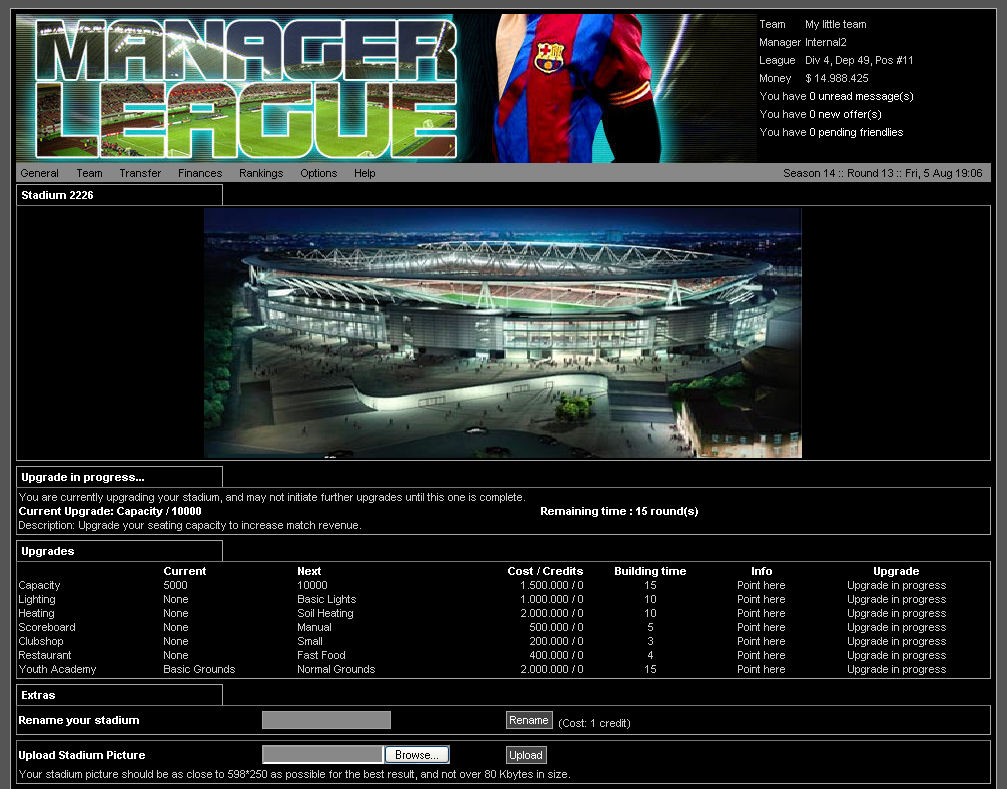
Your stadium is your main source of income, not to be disregarded. The first upgrade you should start, is the Capacity Upgrade. Being able to have 10.000 fans there rather than 5.000 is vital. So with no further explanation needed, just start that upgrade. It is popular to upload ones own stadium picture here as well, so if you are willing to spend a credit, upgrade yuor stadium with the Picture Upload upgrade. The transfer-market Now it is time to consider a player-purchase if you think you need it, and if you have some money left over. In the menu, go to Transfer / The Transferlist. Here you can search for the kind of player you need. If you feel you need a good striker, search for an attacker, with a maximum value of the amount of money you feel like spending. Remember the saying: "A good attacker can win a match, a good goalie can win a season". Wether you buy a player or not, is up to you, you can always save the money for later, it will be scarce in the beginning. Thats it, really! You have now completed the first important steps towards becoming a sucessfull manager in ManagerLeague. We hope this tutorial is sufficient to get you going, and that you will explore the other sections and features of this game. Do not forget to say hi on the forums, or in the chat-channel we have. If you do not know what IRC means, just go to General / ML-Chat in the menu. If you do know what IRC is, we can be found at irc.netgamers.org, #managerleague. Part II of this tutorial will come soon... Spinner ManagerLeague Headquarters |
This article has been read 73880 times. |
|
You are currently not logged into ManagerLeague If you wish to log in, click here. If you wish to sign up and join us, click here. |
| Getting Started with ManagerLeague - Part I | <--Back |
|
|
| 133 comment(s) |
|
|||||||||||||||||||||||||||||||||||||||||||||||||||||||||||||||||||||||||||||||||||||||||||||||||||||||||||||||||||||||||||||||||||||||||||||||||||||||||||||||||||||||||||||||||||||||||||||||||||||||||||||||||||||||||||||||||||||||||||||||||||||||||||||||||||||||||||||||||||||||||||||||||||||||||||||||||||||||||||||||||||||||||||||||||||||||||||||||||||||||||||||||||||||||||||||||||||||||||||||||||||||||||||||||||||||||||||||||||||||||||||||||||||||||||||||||||||||||||||||||||||||||||||||||||||||||||||||||||||||||||||||||||||||||||||||||||||||||||||||||||||||||||||||||||||||||||||||||||||||||||||||||||||||||||||||||||||||||||||||||||||||||||||||||||||||||||||||||||||||||||||||||||||||||||||||||||||||||||||||||||||||||||||||||||||||||||||||||||||||||||||||||||||||||||||||||||||||||||||||||||||||||||||||||||||||||||||||||||||||||||||||||||||||||||||||||||||||||||||||||||||||||||||||||||||||||||||||||||||||||||||||||||||||||||||||||||||||||||||||||||||||||||||||||||||||||||||||||||||||||


 )
) 


| © 2003-2007 Fifth Season AS, Oslo, Norway. Privacy Policy. Rules and Code of Conduct. Sitemap. Responsible Editor for ManagerLeague is Christian Lassem. |